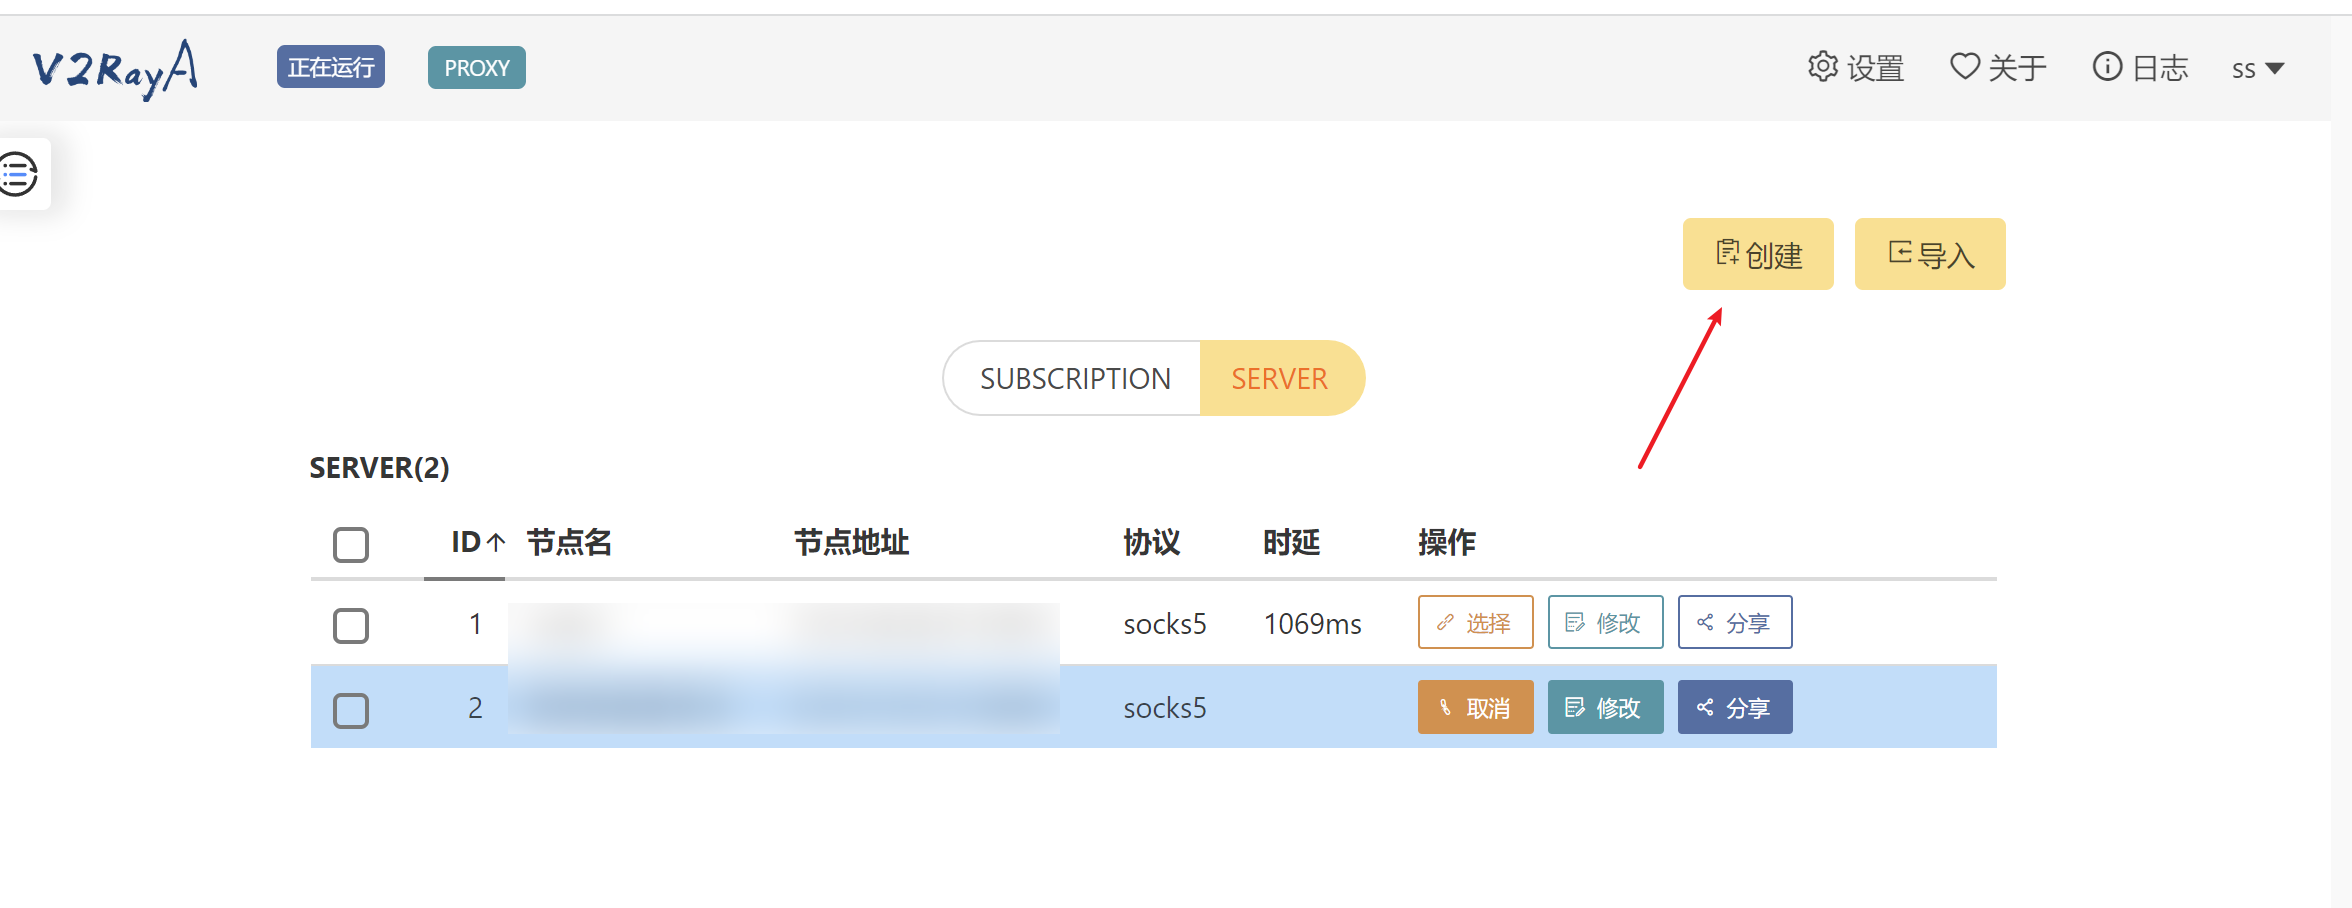
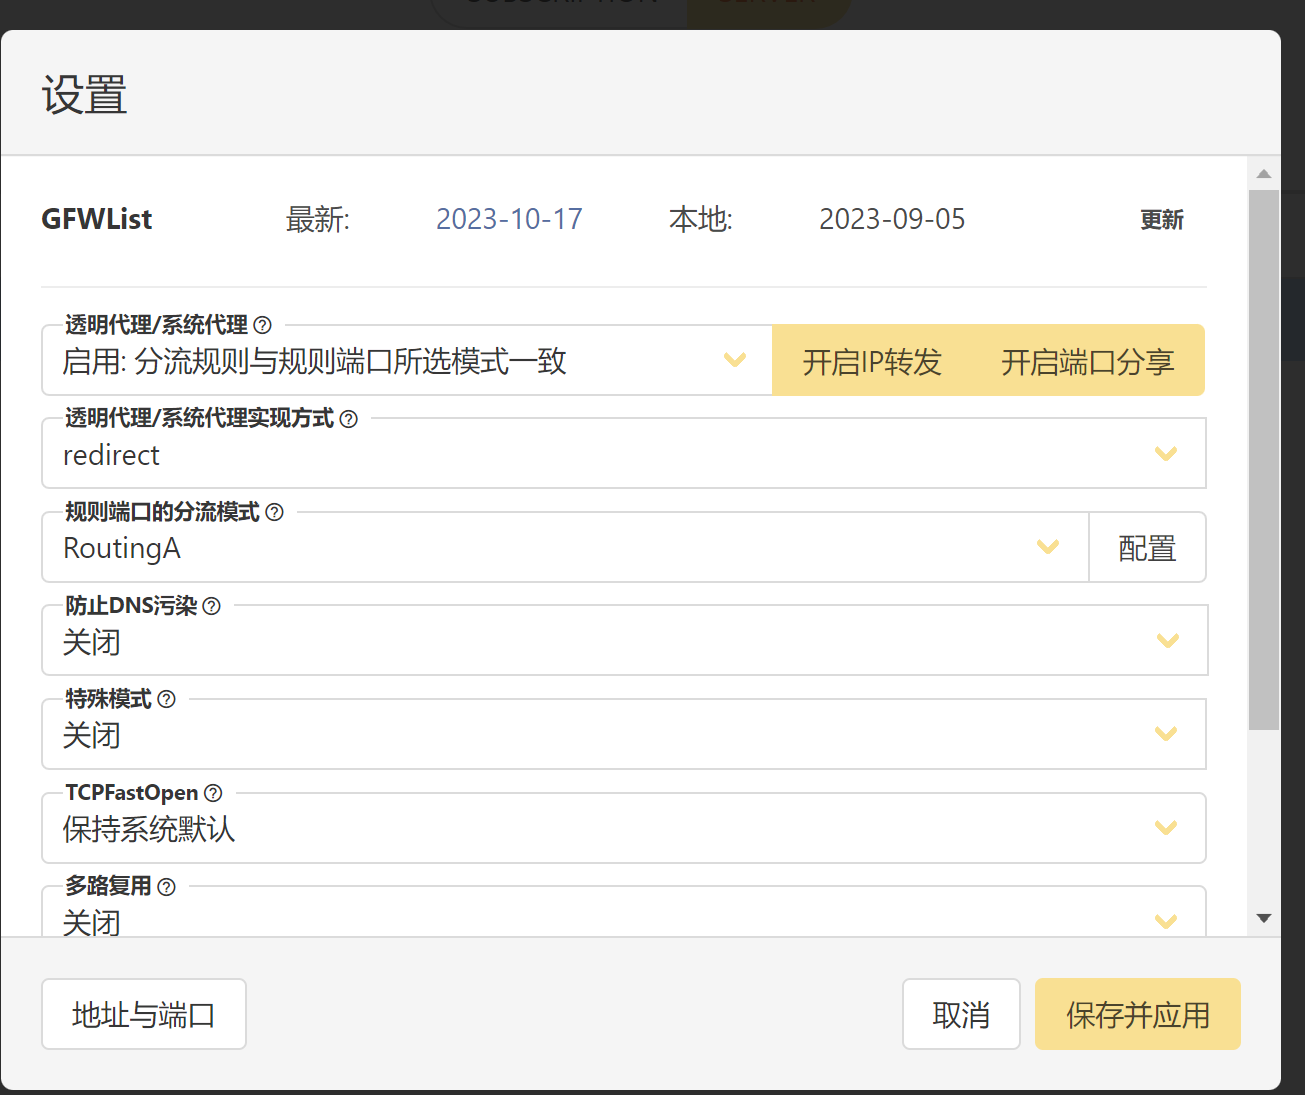
Q's blog

一些个人文档笔记

https://blog.csdn.net/qq_35583325/article/details/132410819

https://blog.51cto.com/kaliarch/4919159

https://blog.csdn.net/sanhewuyang/article/details/128959394

minio

创建velero凭证

1
2
3
4
5
cat > credentials-velero << EOF
[default]
aws_access_key_id = admin
aws_secret_access_key = admin123456
EOF

安装 velero

1
2
3
4
5
6
7
8
9
10
11
12
#bucket要填写在minio控制台创建的名字:data
#secret-file要指向前面创建的秘钥文件:/root/credentials-velero
#安装时velero需加上--use-restic参数表示使用restic备份pv数据
velero install \
--provider aws \
--kubeconfig ~/.kube/config \
--namespace velero-system \
--plugins velero/velero-plugin-for-aws:v1.4.1 \
--bucket data \
--secret-file /root/credentials-velero \
--use-volume-snapshots=false \
--backup-location-config region=minio,s3ForcePathStyle="true",s3Url=http://192.168.100.225:9000

阿里云

创建velero凭证

1
2
3
4
5
cat > credentials-velero << EOF
[default]
ALIBABA_CLOUD_ACCESS_KEY_ID=xxxx
ALIBABA_CLOUD_ACCESS_KEY_SECRET=xxxxx
EOF

Policy策略

1
2
3
4
5
6
7
8
9
10
11
12
13
14
15
16
17
18
19
20
21
22
23
24
25
26
27
28
29
30
31
32
{
"Version": "1",
"Statement": [
{
"Effect": "Allow",
"Action": "oss:ListBuckets",
"Resource": "acs:oss:*:*:*"
},
{
"Effect": "Allow",
"Action": [
"oss:ListObjects",
"oss:GetBucketAcl"
],
"Resource": [
"acs:oss:*:*:k8s-file-backup"
]
},
{
"Effect": "Allow",
"Action": [
"oss:GetObject",
"oss:GetObjectAcl",
"oss:PutObject",
"oss:DeleteObject"
],
"Resource": [
"acs:oss:*:*:k8s-file-backup/*"
]
}
]
}

安装 velero

1
2
3
4
5
6
7
8
9
10
11
12
BUCKET=k8s-file-backup
REGION=cn-hangzhou
velero install \
--provider alibabacloud \
--image registry.$REGION.aliyuncs.com/acs/velero:1.4.2-2b9dce65-aliyun \
--bucket $BUCKET \
--secret-file ./credentials-velero \
--use-volume-snapshots=false \
--backup-location-config region=$REGION,network=internal \
--use-restic \
--plugins registry.$REGION.aliyuncs.com/acs/velero-plugin-alibabacloud:v1.0.0-2d33b89 \
--wait

操作系统初始化配置

1
2
3
4
5
6
7
8
9
10
# 关闭防火墙
sudo systemctl stop firewalld
sudo systemctl disable firewalld

# 关闭SeLinux
sudo setenforce 0
sudo sed -i 's/^SELINUX=enforcing$/SELINUX=permissive/' /etc/selinux/config

# 设置主机名
hostnamectl set-hostname <hostname>

离线部署

下载 K3s 资源包
1
2
3
wget http://rancher-mirror.rancher.cn/k3s/v1.24.17-k3s1/k3s-airgap-images-amd64.tar.gz # 依赖包
wget http://rancher-mirror.rancher.cn/k3s/v1.24.17-k3s1/k3s # 二进制文件
wget http://rancher-mirror.rancher.cn/k3s/k3s-install.sh # 安装脚本

部署(Docker方式)

1
2
3
4
5
6
7
8
9
10
11
12
13
14
15
16
17
18
19
mkdir -p /var/lib/rancher/k3s/agent/images/
chmod +x k3s
chmod +x k3s-install.sh
mv k3s /usr/local/bin
mv k3s-airgap-images-amd64.tar.gz /var/lib/rancher/k3s/agent/images/
docker load -i /var/lib/rancher/k3s/agent/images/k3s-airgap-images-amd64.tar.gz

INSTALL_K3S_SKIP_START=true \
INSTALL_K3S_SKIP_ENABLE=true \
INSTALL_K3S_SKIP_DOWNLOAD=true \
K3S_NODE_NAME=k3s-node-01 \
K3S_TOKEN=vDABBTHmy2xMdkjP \
INSTALL_K3S_EXEC='server --write-kubeconfig ~/.kube/config \
--write-kubeconfig-mode 644 \
--cluster-cidr 10.20.0.0/16 \
--service-cidr 10.21.0.0/16 \
--tls-san k3s-local.suosihulian.cn \
--docker \
--node-ip 172.12.1.150' ./k3s-install.sh
1
2
3
4
5
6
7
8
9
10
11
12
13
安装时的一些参数解释
-–datastore-endpoint value:指定 etcd、Mysql、Postgres 或 Sqlite(默认)数据源名称
-–docker:用docker代替containerd
-–no-deploy value:不需要部署的组件 (有效选项: coredns, servicelb, traefik, local-storage, metrics-server)
-–write-kubeconfig value:将管理客户端的kubeconfig写入这个文件
-–write-kubeconfig-mode value:用这种模式编写kubeconfig,例如:644
-–tls-san value:在 TLS 证书中添加其他主机名或 IP 作为主题备用名称
-–node-ip value:为节点发布的 IP 地址
-–node-taint value:用一组污点注册kubelet(默认情况下,k3s 启动 master 节点也同时具有 worker 角色,是可调度的,因此可以在它们上启动工作,可以采用此方式解决)
--cluster-cidr 10.20.0.0/16
--service-cidr 10.21.0.0/16
--service-node-port-range 80-32767
--disable-helm-controller
1
2
3
4
5
6
7
8
9
10
参数对应使用示例:

export INSTALL_K3S_EXEC="server --datastore-endpoint mysql://root:root@tcp(k3s-mysql-server:3306)/k3s \
--docker \
--no-deploy traefik \
--write-kubeconfig ~/.kube/config \
--write-kubeconfig-mode 644 \
--tls-san 152.136.181.95 \
--node-ip 152.136.181.95 \
--node-taint k3s-controlplane=true:NoExecute

加入 Node 节点

下载资源

二进制文件

安装脚本

参考

https://blog.csdn.net/qq_42889280/article/details/123994851

需求:

国内机器连接时在本地或局域网实现pac策略

实现

现有国外节点,开启代理服务且需要用户名密码认证

linux 配置代理方法: https://eternalcenter.com/proxy/

1
2
3
4
5
export http_proxy=http://8.8.8.8:80
export https_proxy=http://8.8.8.8:8080
export no_proxy=”localhost,127.0.0.1,::1″

或者export http_proxy=http://admin:123@8.8.8.8:80
客户端 服务端
v2rayA Shadowsocks
privoxy v2ray
goproxy

privoxy相对简单且容易配置

v2rayA功能强大但占用资源比privoxy多

使用privoxy

1
2
3
4
5
6
7
8
9
10
11
12
13
14
15
16
17
18
19
20
21
22
23
24
25
26
1. 服务器安装privoxy
apt install -y privoxy
2. Privoxy 的配置文件路径为 /usr/privoxy/config,我们需要修改里面的 listen-address 选项和pac选型
actionsfile pac.action
listen-address 0.0.0.0:8118
3. 添加pac规则文件
cat /etc/privoxy/pac.action
{{alias}}
default=+forward-override{forward .}
#pac=+forward-override{forward-socks5 admin:admin@192.168.28.67:10810 .} 支持用户名密码验证
pac=+forward-override{forward-socks5 192.168.28.67:10810 .}
{default}
/
{pac} # 这个里面是走代理
.cip.cc
.baidu.com
.google.com

4. 重启 Privoxy 服务
systemctl restart privoxy.service
5. 设置代理
export http_proxy=http://127.0.0.1:8118
export https_proxy=http://127.0.0.1:8118
export no_proxy=”localhost,127.0.0.1,::1
6. 访问即可
curl cip.cc # 会显示代理服务器ip地址

使用v2rayA(客户端)

  1. 安装docker 1.20版本以上

  2. 启动容器

1
2
3
4
5
6
7
8
9
10
11

docker run -d \
--restart=always \
--privileged \
--network=host \
--name v2raya \
-e V2RAYA_LOG_FILE=/tmp/v2raya.log \
-v /lib/modules:/lib/modules:ro \
-v /etc/resolv.conf:/etc/resolv.conf \
-v /etc/v2raya:/etc/v2raya \
mzz2017/v2raya:2.2.4
  1. 访问服务器2017端口

  2. 在页面上创建上游代理服务器

image-20231020153502393

  1. 点击服务器的选择按钮,选择要使用的上游代理

  2. 点击右上角设置

    1. image-20231020153725455

    2. 配置规则分流

      image-20231020153801838

      1. 保存后,在页面左上角启动代理就会看到服务区上监听了20172的分流http端口
  3. 即可在linux上配置代理使用了

服务端部署

v2ray

1
2
https://github.com/233boy/v2ray
bash <(wget -qO- -o- https://git.io/v2ray.sh)

1
2
3
4
5
6
7
8
9
10
11
12
spring:
datasource:
hikari:
minimum-idle: 10
maximum-pool-size: 100
idle-timeout: 10000
max-lifetime: 30000
connection-timeout: 30000
login-timeout: 5
validation-timeout: 3000
connection-test-query: SELECT 1
validation-query: SELECT 1

validation-query

validation-query 是一个 SQL 查询语句,用于验证连接是否仍然有效。当连接从连接池中获取并且处于空闲状态时,Hikari 连接池会执行 validation-query 来确保连接仍然有效。如果执行 validation-query 失败或返回的结果不符合预期,连接将被标记为无效并从连接池中移除,然后将会尝试获取一个新的连接来替代。默认情况下,validation-query 被设置为 null,表示不进行连接的验证。

connection-test-query

connection-test-query 是一个可选的 SQL 查询语句,用于在连接被创建时进行测试。当连接池创建新的连接时,会在连接被返回之前执行 connection-test-query。如果执行 connection-test-query 失败或返回的结果不符合预期,连接将被标记为无效并丢弃,然后将会尝试获取一个新的连接来替代。默认情况下,connection-test-query 被设置为 null,表示不进行连接的测试。

总结起来,validation-query 在连接从连接池中获取时进行验证,而 connection-test-query 在连接被创建时进行测试。这两个属性的目的都是确保连接的有效性,并在需要时替换无效的连接。

validation-timeout 毫秒 默认5s

当连接从连接池中获取并且处于空闲状态时,连接池会执行 validation-query 来验证连接的有效性。validation-timeout 指定了执行验证查询的最大等待时间。如果在指定的超时时间内无法完成验证查询,连接将被标记为无效并从连接池中移除,然后将会尝试获取一个新的连接来替代。

对我来说netbird比headscale好处就是可以分组自定义peer路由,完全实现服务端控制下发路由,且下发和回收路由速度几乎秒级(headscale关闭路由后很长时间不清理路由)

阅读全文 »

参考:

https://icloudnative.io/posts/custom-derp-servers/

自建私有 DERP server

使用内嵌derp

1
2
3
4
5
6
7
8
9
10
11
12
13
14
15
16
17
18
19
20
21
22
23
24
25
26
27
28
29
30
31
32
33
34
35
server_url: https://xxxxxxxx  # 必须是https
derp:
server:
# If enabled, runs the embedded DERP server and merges it into the rest of the DERP config
# The Headscale server_url defined above MUST be using https, DERP requires TLS to be in place
enabled: true

# Region ID to use for the embedded DERP server.
# The local DERP prevails if the region ID collides with other region ID coming from
# the regular DERP config.
region_id: 999

# Region code and name are displayed in the Tailscale UI to identify a DERP region
region_code: "headscale"
region_name: "Headscale Embedded DERP"

# Listens over UDP at the configured address for STUN connections - to help with NAT traversal.
# When the embedded DERP server is enabled stun_listen_addr MUST be defined.
#
# For more details on how this works, check this great article: https://tailscale.com/blog/how-tailscale-works/
stun_listen_addr: "0.0.0.0:3478"

# List of externally available DERP maps encoded in JSON
urls:
#- https://controlplane.tailscale.com/derpmap/default
# Locally available DERP map files encoded in YAML
#
# This option is mostly interesting for people hosting
# their own DERP servers:
# https://tailscale.com/kb/1118/custom-derp-servers/
#
# paths:
# - /etc/headscale/derp-example.yaml
paths:
# - /etc/headscale/derp.yaml

nginx:

1
2
3
4
5
6
7
8
9
10
11
12
13
14
15
16
17
18
19
20
21
22
23
24
25
26
27
28
map $http_upgrade $connection_upgrade {
default keep-alive;
'websocket' upgrade;
'' close;
}
server {
listen 443 ssl;
server_name xxx;
ssl_certificate certs/xxx.pem;
ssl_certificate_key certs/xxxx.key;
location /web { # web管理可使用https://github.com/gurucomputing/headscale-ui
alias /root/web;
index index.html;
}
location / {
proxy_pass http://127.0.0.1:8080;
proxy_buffering off;
proxy_http_version 1.1;
proxy_set_header Upgrade $http_upgrade;
proxy_set_header Connection $connection_upgrade;
proxy_set_header Host $server_name;
proxy_set_header X-Real-IP $remote_addr;
proxy_set_header X-Forwarded-For $proxy_add_x_forwarded_for;
proxy_set_header X-Forwarded-Proto $http_x_forwarded_proto;
add_header Strict-Transport-Security "max-age=15552000; includeSubDomains" always;
}
}

使用域名

1
2
3
4
5
6
7
docker run --restart always \
--name derper -p 12345:12345 -p 3478:3478/udp \
-v /root/certs:/app/certs \
-e DERP_CERT_MODE=manual \
-e DERP_ADDR=:12345 \
-e DERP_DOMAIN=xxxx \
-d ghcr.io/yangchuansheng/derper:latest

有几点需要注意:

  • 能用 443 端口尽量用 443 端口,实在不行再用别的端口;
  • 默认情况下也会开启 STUN 服务,UDP 端口是 3478
  • 防火墙需要放行端口 12345 和 3478;
  • 准备好 SSL 证书;
  • 域名部分我打了码,请换成你自己的域名。

假设你的域名是 xxx.com,那么证书的名称必须是 xxx.com.crt,一个字符都不能错!同理,私钥名称必须是 xxx.com.key,一个字符都不能错!

部署好 derper 之后,就可以修改 Headscale 的配置来使用自定义的 DERP 服务器了。Headscale 可以通过两种形式的配置来使用自定义 DERP:

  • 一种是在线 URL,格式是 JSON,与 Tailscale 官方控制服务器使用的格式和语法相同。
  • 另一种是本地文件,格式是 YAML

我们可以直接使用本地的 YAML 配置文件,内容如下:

1
2
3
4
5
6
7
8
9
10
11
12
13
14
15
16
17
18
19
20
21
22
23
24
25
26
27
28
29
30
31
32
33
# /etc/headscale/derp.yaml
regions:
900:
regionid: 900
regioncode: thk
regionname: Tencent Hongkong
nodes:
- name: 900a
regionid: 900
hostname: xxxx
ipv4: xxxx
stunport: 3478
stunonly: false
derpport: 12345
- name: 900b
regionid: 900
hostname: xxxx
ipv4: xxxx
stunport: 3478
stunonly: false
derpport: 12345
901:
regionid: 901
regioncode: hs
regionname: Huawei Shanghai
nodes:
- name: 901a
regionid: 901
hostname: <这里写域名>
ipv4: xxxx <如果域名可以解析就删掉这个配置>
stunport: 3478
stunonly: false
derpport: 12345

配置说明:

  • regions 是 YAML 中的对象,下面的每一个对象表示一个可用区,每个可用区里面可设置多个 DERP 节点,即 nodes
  • 每个可用区的 regionid 不能重复。
  • 每个 nodename 不能重复。
  • regionname 一般用来描述可用区,regioncode 一般设置成可用区的缩写。
  • ipv4 字段不是必须的,如果你的域名可以通过公网解析到你的 DERP 服务器地址,这里可以不填。如果你使用了一个二级域名,而这个域名你并没有在公共 DNS server 中添加相关的解析记录,那么这里就需要指定 IP(前提是你的证书包含了这个二级域名,这个很好支持,搞个泛域名证书就行了)。
  • stunonly: false 表示除了使用 STUN 服务,还可以使用 DERP 服务。
  • 上面的配置中域名和 IP 部分我都打码了,你需要根据你的实际情况填写。

接下来还需要修改 Headscale 的配置文件,引用上面的自定义 DERP 配置文件。需要修改的配置项如下:

1
2
3
4
5
6
7
8
9
10
11
12
13
14
15
16
17
18
19
20
21
22
23
24
# /etc/headscale/config.yaml
derp:
# List of externally available DERP maps encoded in JSON
urls:
# - https://controlplane.tailscale.com/derpmap/default

# Locally available DERP map files encoded in YAML
#
# This option is mostly interesting for people hosting
# their own DERP servers:
# https://tailscale.com/kb/1118/custom-derp-servers/
#
# paths:
# - /etc/headscale/derp-example.yaml
paths:
- /etc/headscale/derp.yaml

# If enabled, a worker will be set up to periodically
# refresh the given sources and update the derpmap
# will be set up.
auto_update_enabled: true

# How often should we check for DERP updates?
update_frequency: 24h

重启后访问https://xxxx:12345

image-20230904112310981

tailscale netcheck

image-20230904113158291

image-20230904113347653

对比

1
2
3
4
5
6
7
8
9
10
11
12
13
14
15
16
17
18
19
20
21
22
23
24
25
26
27
28
29
30
31
32
33
34
35
36
37
38
39
40
41
服务器C ping 服务器A 内网docker服务
# 不使用打洞
C:\WINDOWS\system32>ping 172.19.2.2 -t

正在 Ping 172.19.2.2 具有 32 字节的数据:
来自 172.19.2.2 的回复: 字节=32 时间=9ms TTL=63
来自 172.19.2.2 的回复: 字节=32 时间=7ms TTL=63
来自 172.19.2.2 的回复: 字节=32 时间=109ms TTL=63
来自 172.19.2.2 的回复: 字节=32 时间=6ms TTL=63
来自 172.19.2.2 的回复: 字节=32 时间=7ms TTL=63
来自 172.19.2.2 的回复: 字节=32 时间=92ms TTL=63
来自 172.19.2.2 的回复: 字节=32 时间=7ms TTL=63
来自 172.19.2.2 的回复: 字节=32 时间=78ms TTL=63
来自 172.19.2.2 的回复: 字节=32 时间=7ms TTL=63
来自 172.19.2.2 的回复: 字节=32 时间=12ms TTL=63
来自 172.19.2.2 的回复: 字节=32 时间=62ms TTL=63

# 使用打洞
C:\WINDOWS\system32>ping 172.19.2.2 -t

正在 Ping 172.19.2.2 具有 32 字节的数据:
来自 172.19.2.2 的回复: 字节=32 时间=23ms TTL=63
来自 172.19.2.2 的回复: 字节=32 时间=10ms TTL=63
来自 172.19.2.2 的回复: 字节=32 时间=7ms TTL=63
来自 172.19.2.2 的回复: 字节=32 时间=9ms TTL=63
来自 172.19.2.2 的回复: 字节=32 时间=7ms TTL=63
来自 172.19.2.2 的回复: 字节=32 时间=9ms TTL=63
来自 172.19.2.2 的回复: 字节=32 时间=5ms TTL=63
来自 172.19.2.2 的回复: 字节=32 时间=6ms TTL=63

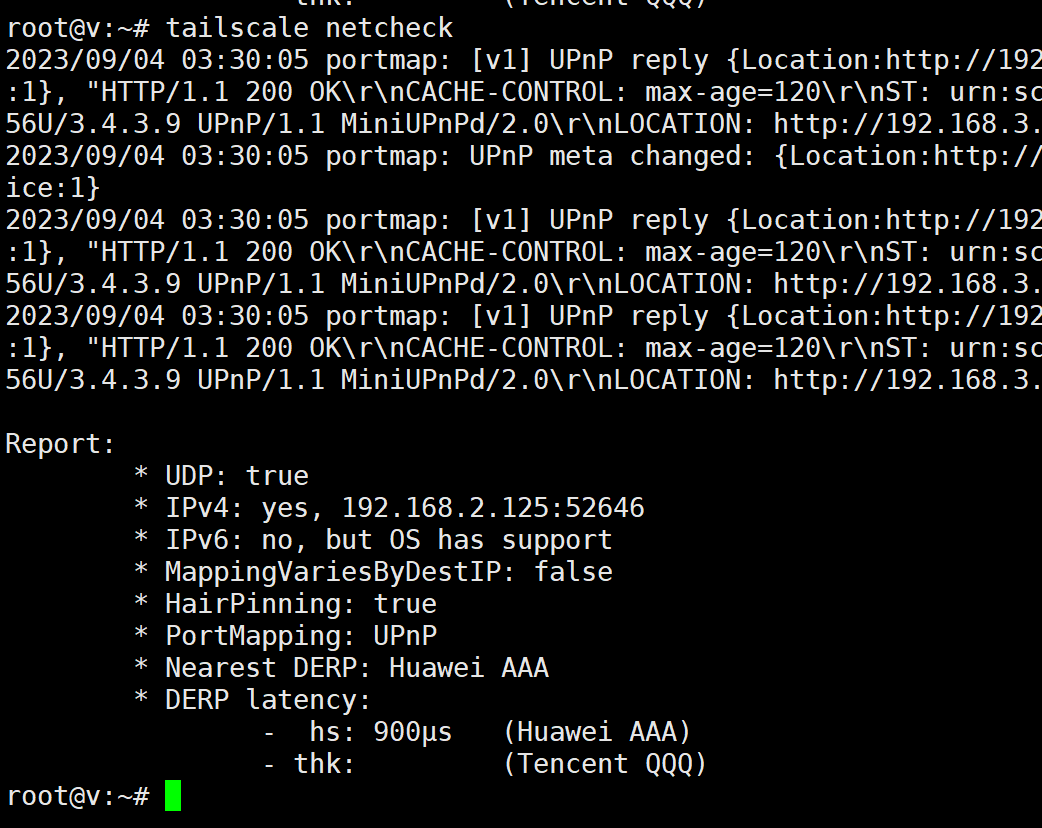
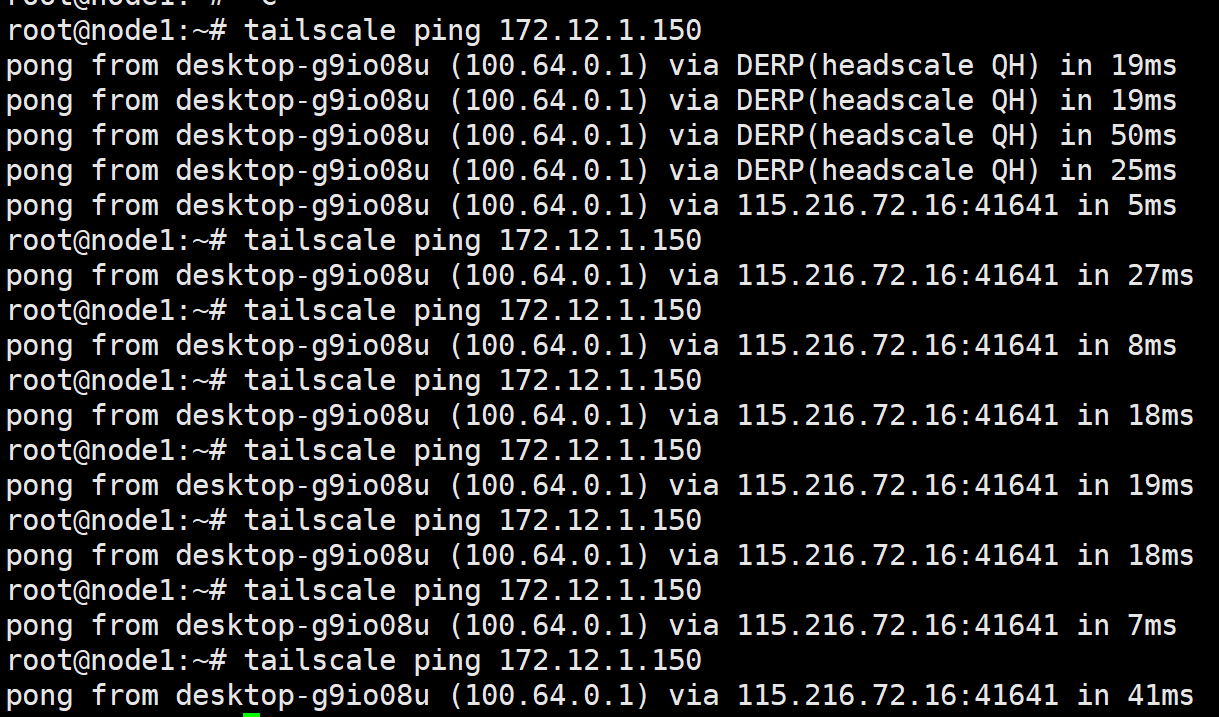
# 也可以使用 Tailscale 命令行工具来测试:
# 这个命令好像只能ping一次。。
C:\WINDOWS\system32>tailscale ping -c 0 172.19.2.2
pong from v (fd7a:115c:a1e0::2) via 192.168.2.125:41641 in 13ms --->通过ipv6点对点
pong from v (fd7a:115c:a1e0::2) via DERP(qh) in 10ms --->通过DERP

一般来说,如果算到点对点就优先走点对点,否则走了DERP延迟更高

image-20230905130501726

防止 DERP 被白嫖

先在derp节点启动tailscale

1
2
headscale preauthkeys create -e 24h -u t1
tailscale up --accept-dns=false --accept-routes=true --auth-key=xxx --login-server=http://192.168.2.124:8080

再启动derp

1
2
3
4
5
6
7
8
9
docker run --restart always \
--name derper -p 12345:12345 -p 3478:3478/udp \
-v /root/certs:/app/certs \
-e DERP_CERT_MODE=manual \
-e DERP_ADDR=:12345 \
-e DERP_DOMAIN=sit-wg.suosihulian.cn \
-e DERP_VERIFY_CLIENTS=true \
-v /var/run/tailscale/tailscaled.sock:/var/run/tailscale/tailscaled.sock \
-d ghcr.io/yangchuansheng/derper:latest
0%